Hi everyone and welcome to another Saturday Step by Step, this time hosted by me, Buttons. I figured as our current challenge involves anything with folds I'd pass on a fantastic 'one sheet wonder' folded booklet; this was taught to me by the wonderful (Certified Ranger Eductator) Annaliese Bates of L'atelier at the Stitches show earlier this year. There is no need for glue, scissors (or if you are feeling really brave a ruler!) Warning; this is picture heavy but you need it, trust me.
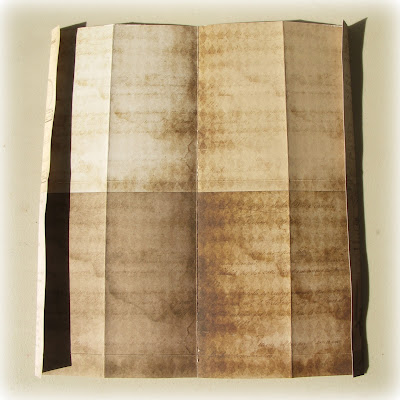
Start with a double-sided piece of 12x12 cardstock. Right side facing you, fold up about 3/4 inches from the bottom. Don't worry about mountain/valley and all that business. You just need a good fold. I fold it backwards and forwards to make sure the crease is firm and flexible.
Turn your card around and fold up to meet your new crease line.
Unfold these creases and fold down the centre lengthwise.
Now fold the sides into the centre lengthwise to divide your card into four strips.
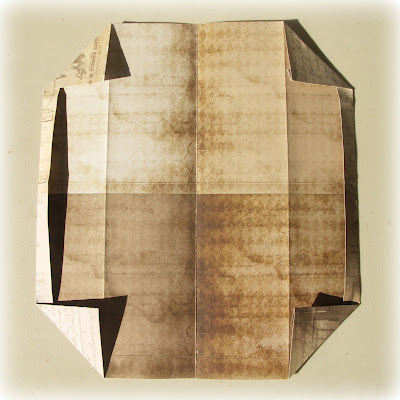
Open it all out and lay your card face down with the first crease at the bottom. Now fold each of the sides in by 3/4 inch.
Keeping those creases folded now turn up each corner to meet the next crease lines in.
Fold these triangular cornered parts in on themselves along the existing crease lines (so now the back is showing in the middle and the front is showing at the edges).
Now for the fun bit. Keeping those triangular bits folded, fold the whole thing in half along the existing 'central' crease line (apologies for the shadows, the sun is really bright this morning!)
OK, I'll do this bit slowly for you. Bend back your original 3/4 inch crease line (which now has little folded triangles in the corners).
Slot the top of your cardstock into the triangles like this. I've done the one on the left so you can see. Do the same with the one on the right.
Now just fold the whole thing in half along the existing central crease line, and hey presto! Here's the outer sides (it's worth giving everything a good fold and wiggle around to settle it into place).
And here's what the inside should look like.
And just take a look at how many pockets you've got for adding in your tags, messages, ATC's, oh the list is limitless!
And of course there's more on the flip side (plus extras at the top that I haven't even put things into!
And here's a few I made earlier so you can get to see all the angles.
Now for those of you who will ask for a video, well I could if there's enough demand, but this way you get to save the photos and have your very own crib sheet (you won't need it after a couple though).
OK, so now you'll have to see what I did with them on Wednesday when it's the Funkie team's turn to show you their projects for the
And of course I want to see what you do with yours too, because then you get to join the challenge and be in with a chance of winning a spending spree at The Funkie Junkie Boutique (where you can of course purchase some fantastic 12x12 papers, including some scrummy new Maja Designs ones that I can't wait to get my mits on!) Thanks for joining me and take care of yourselves, hugs Jenny xxx


Wow, fantastic and such a great way to use all these fabulous papers. I will definitely give this a go!! Love it!!
ReplyDeleteHi Jenny, what a fantastic idea, I just love paper folding and will definitely try this out - in fact I am going to do it right now! Hugs, Anne x
ReplyDeleteGreat idea and I love all the pockets that are created! Chris x
ReplyDeleteThis looks fascinating so I will just to have a go later. Thanks for sharing all the photos.
ReplyDeleteThis is fantastic! I love the pockets that appear and there are so many beautiful papers to use for this. Thanks for sharing!
ReplyDeleteHi Jenny, This is really good fun to do, great instructions have made a couple already. Hugs Mo x
ReplyDeleteThis is very special and I will definitely give it a go!
ReplyDeletesandy
Very cool tutorial... I'm going to have to get a piece of paper and bring it to the computer to sit and try it!
ReplyDeleteAlison x
Ok my first one did not turn out so great but I do get it and will have to make a cool one and combine with tags for a great "Birthday card" for my boss and one for my hubby!
ReplyDeleteI would really like a video, I have tried this three times and it still isn't right!! I hope I am not the only one with this problem. I definitely need more help - just for the record, I can't put puzzles together either.
ReplyDeleteJenny
This looks cool but since I am brain dead today, I will hold off trying it until the cells regenerate (if they do) :) You have lots of great photos so if I do as I am told, it should work - right!
ReplyDeleteThis looks really cool. I have to try it.
ReplyDeleteThis looks great will definately give this a try, great photo tutorial x hugs x trace x
ReplyDeleteJust folded my paper and it was very fun and easy to follow your instructions and photos! Beautiful and thank you for the tutorial!
ReplyDeleteWhat a great step by step project I must have a go at this.
ReplyDeleteHugs
Patricia xxx
AWESOME.............thanks for taking the time to provide the step-by-step instructions!!
ReplyDeleteMorning Jenny, Wow !! I agree with Jenny above, although your tutorial by pics is fantastic, I would love, love, love a video of you doing it. I will give it a go, but don't know how successful I will be ha ha, things tend to take a long time to 'sink in' with me ha ha. Stunning make, I can see lots of uses for this make and loads of pockets for tags etc.
ReplyDeleteLots of love from Patricia xx
I end up not using double sided DP as I dislike hiding both sides! This will so work, Jenny and what a great tutorial! Thank you for sharing! Hugs!
ReplyDelete