
Today I am going to show you how I made a card that I posted last week on my blog called Love Hearts. The card had to be in the colours of the flag of my country and since I am from Canada that meant red and white.
I started by choosing a number of red and white papers, some of which were already in my stash and the rest were digital papers that I have collected. By the way, I was having trouble with my camera so all the photos have been taken with a piece of black card stock as the background but I was working on a craft sheet.

I used the Moroccan paper as my background and then I cut a number of papers 2" x 3". Each of these papers was rolled around a wooden skewer and fastened with some double-sided tape. Once fastened, I flattened the roll slightly so the seam was on the bottom.

I hand cut a heart shape from card stock and then glued enough rolls to the heart to completely cover it. After all the rolls were in place, I turned the heart over and drew a line around the edge of the heart and then trimmed all the rolls to the size of the heart.

Then I glued some red ric rac around the cut edge of the Heart and added some lace to the back side of the heart.
I also cut a heart from white corrugated cardboard and inked it liberally with some Fired Brick Distress Ink. I discovered that if you soak the cardboard too much the backing comes off but I have kept it and plan to use it on another project because it looks like vintage red and white ticking.
Once the heart had the color I wanted, I covered it with Clear Rock Candy Distress Crackle Paint. When it was dry I mounted it on some red card stock that was inked with the Fired Brick Distress Ink.

I added a crinkled seam binding bow and a red paper rose to each heart. Here are the finished hearts.

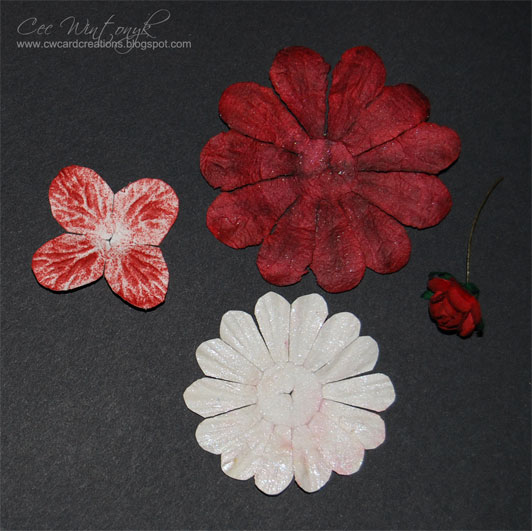
The big flower was made by taking some paper flowers and altering them. The large one was coloured with a bit of Cranberry Adirondack Alcohol Ink first so there would be some intense spots. Then I dabbed the Fired Brick Distress Ink pad on the craft sheet, spritzed it with water and rolled the flower around the puddle of colour until it was saturated.
The middle one was sprayed with some pearl glimmer mist and the smaller one was dry inked with the Distress Ink. Then I stacked them all together with a red paper rose in the centre. I noticed that there was a bit of red left on my craft sheet that managed to attach itself to the middle flower but it didn't bother me so I left it.
The little hearts were punched from card stock, the edges inked and then the word LOVE was stamped with the Fired Brick Distress Ink.

To finish the card, I distressed around the background paper with my scissors and then inked it with the Fired Brick Distress Ink. The big hearts were mounted next and I added a band of red burlap with another band of white crepe paper and the little word hearts attached before I mounted the big layered flower.

Here are a few items used to make this card that can be found at the Funkie Junkie Boutique where you will always find prices discounted from the manufacturer's suggested price along with the most wonderful customer service.
Beautiful card Cec ! I love the way you've created the heart from rolls of paper ! Fabulous step x step ! Sue C x
ReplyDeleteI am impressed by the quality of information on this website. There are a lot of good resources here. I am sure I will visit this blog again soon.canada movers
ReplyDeleteWhat a beautiful card. Thank you so much for such an informative tutorial. Hugs from Scotland. Rita xxxxx
ReplyDeleteWowwzerss Cec it is looking fabulous thank you for sharing your Tutorial, I just love hearts and your hearts are looking just fabulous Hugs Terry xxxx
ReplyDeleteCongratulations on your DT position. Your card is beautiful and your step-by-step was excellent, thank you for sharing. Hugs, Anne x
ReplyDeleteA fantastic tutorial here at F&F Cec. It's so good to have you on board with the Frilly team. This taste of things to come has got me hooked and I can't wait to see more. Hugs, Jenny xxx
ReplyDeleteWelcome to the team, Cec. Your first tutorial is sensational! The rolled paper to create the heart is genius - wonderful texture combined with terrific patterns. Such a pretty card, all in my favorite color too!
ReplyDeleteHugs,
Linda
What a fabulous debut step-by-step - that rolled paper heart looks amazing - such a pretty card!
ReplyDeleteAlison x
Love the rolled hearts , a great step x step .welcome to the team hugs x
ReplyDelete