Hi everyone. Jenny here with our regular Friday Focus feature here at Frilly and Funkie. This week's featured product is relatively new to the market so it's really special that Linda has chosen to give everyone a 15% discount for this coming week (and that's on top of the current discounted prices!!) You can find them HERE.
I've become seriously addicted to Distress Glitters recently as they are incredibly opaque and don't leave my clothing, house. family, dog, etc. sparkling for days. I wouldn't mind but they're not so keen - LOL!
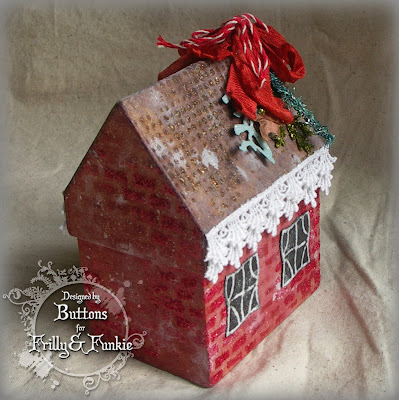
This little papermache box has a removable lid and was purchased really cheaply at a local discount store. Having sat, unloved, for a long time it has now been transformed into a special container for a present.
Here's a quick 'how to'. I started by applying cheap PVA glue with a sponge through two stencils (one for the house and one for its roof).
Once the glue had dried Distress Ink was blended over the top. Possibly due to the type of base, the ink seemed to intensify the glued areas rather than being resisted by them.
Having dried the ink the stencils were replaced and another layer of glue applied in patches. Distress Glitters were then sprinkled over the top, allowed to settle/dry and then lightly brushed to remove any excess.
Finally I flicked Dylusions White Linen spray over the whole house to mimic snow, spritzing it with water in places to allow the splotches of ink to run slightly.
The windows were created using Tim Holtz's chalkboard technique (see his November Tag for a step by step). My version used embossed card rather than stamped card, but the effect is the same.
Now for the trimmings. Venise lace gave the roof a rather fancy border, much better than guttering! I used thin Wonder Tape to attach it as this gives a strong enough bond to hold it in position.
Rather that bother with a chimney I went for a seam binding bow with a little bakers twine added. The seam binding is coloured with Distress Stain and crinkles beautifully when dried with a heat gun.
Various shapes were cut from the Sizzix Festive Greenery strip die. Most of these were covered in Distress Glitter, though the holly leaves were kraft glassine, inked up with Copper Mixative. The silver tinsel was given a patina, a technique learned from Creative Chemistry 102.
I hope you have got some ideas from this for your own festive projects from this and seen the potential for using these fabulous Distress Glitters. Remember, as a Friday Focus product they will have that extra 15% discount applied for the coming week. They are well worth investing in and will last for ages.
Take care of yourselves,
Jenny


What a lovely Christmas house. Love the lace icicles.
ReplyDeleteThis is so adorable, Jenny! LOVE your house container! It's a present on its own already ;)
ReplyDeleteHugs,
Claudia x
Hi Jenny, this is such a sweet little house and useful too. I am not a glitter person as most know but, I have just bought my first tub of Distress glitter as I have seen so many beautiful projects like yours using it and it looks nice and chunky rather than sandy. The pva glue through the stencil is a technique I have not tried before, so thank you for sharing and for the inspiration. Hugs Mo x
ReplyDeleteThis is so sweetly beautiful Jenny - fabulous as an ornament and container. Thanks for sharing some fab tips too - wouldn't have occured to me to colour the tinsel. Happy Weekend! Nicola x
ReplyDeleteJenny it's a real festive treat - love how the ink grabbed the glue and seam binding teamed with bakers twine for chimneys is perfect. Totally adorable xoxo
ReplyDeleteWhat an adorable little house! I love the Distress Glitters and I love the way you used them with glue through a stencil! This is such a wonderful Christmas project!
ReplyDeleteWhat a gorgeous little house, love the brick background and the colours are so lovely bright and Christmassy, love it!
ReplyDeleteGorgeous Jenny, there is a real charm about this. I real homespun feel. Love the touches of glitter. Fantastic detail. Tracy x
ReplyDeleteBeautiful creation Jenny. Lots of work and textures with this one. Hugs Rita xxx
ReplyDeleteFabulous project Jenny ! What a great wrapping for a gift ! Sue C x
ReplyDeleteOh wow, what a fantastic project Jenny. The textures really stand out and what a creative make it is! xx
ReplyDeleteWow Jenny, this is a present in itself, a fabulous make.
ReplyDeletehugs {brenda} x0x
What a delight of a project - I agree with Brenda that it would make a lovely decorative gift as is!! If only all gutters looked that pretty...
ReplyDeleteAlison xx
Such a beautiful little festive project and what a great holder for a present! Love this. Hugs, Anne x
ReplyDelete