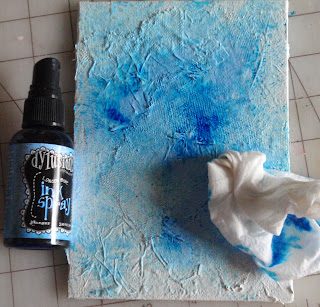
My canvas is 5" x 7" in which I covered with white gesso, applied some white tissue wrap and then torn some off. Next I applied a coat of Mod Podge to the canvas and more torn white tissue and some fine netting. Let this dry and applied another coat of white gesso.
Once dried I gave a spray of Dylusions, London Blue and pounced with a wet baby wipe and also edged with the now blue baby wipe. Let this dry, I then spackled on a couple of snow flakes using Dylusions stencil, lifted the stencil off and then spread a thin layer here and there. Added some Tea Stain and Pearl Fragments. Once dried, I covered with Mod Podge and added different glitters, including some glass glitter. Used one of Tim's music stamps and embossing in gold, here and there. Pretty much that was the background. What took the longest with the background was waiting in between for the layers to dry and I really got pretty excited about adding bits and pieces more!
 |
| Just kept adding glitter, etc! |
The Snowman was cut from grunge paper and chipboard. I cut an extra hat and nose, his scarf and hatband were cut from the dry baby wipe. I gave a quick outline as to where the hat and nose would be placed, as to keep the texture paste off, for a smooth fit. Once I applied my texture paste and it dried, I coated it with white gesso and while wet applied some glitter. From there I applied Mod Podge and more glitter, until I was happy! Any clear drying medium can be used. Between the layers of gesso, Mod Podge, tissue, etc., you can have some messy edges and that is where Tim's little awesome hammer comes into play. I like smooth edges.
 |
| I use waxed paper to lightly press in glitter |

For the finishing, I used some Chit Chat words and edged them with Bronze Distress Metallic Stain and backed them with black. The hat and nose were first colored with Distress Markers and then covered with Stickles. I pounced a couple of holes to wire in my gold pipe cleaner and some gold tinsel and lights.
Thank you so much for stopping by today. I know that we are all so busy this time of year and that makes your visit even more special!


Fabulous canvas, and a wonderful step-by-step to take us through it... thanks so much Terry!
ReplyDeleteAlison x
Wow, this is wonderful. As someone new to mixed media I am very grateful for your step-by-step, Mo :0)
ReplyDeleteI love your wonderful canvas Terry, it was so worth trying out something new because you have done it proud and made a brilliant job of it. Love the step by step too. Really beautiful! x
ReplyDeleteTerry, your canvas is fantastic! I am so glad you shared the step by step today. I loved seeing how you built up all that gorgeous texture. And I'm loving the mental image of you whacking away at it with the hammer!
ReplyDeleteYou can be majorly proud of your canvas Terry - especially as your dont do them often. This is utterly fanbulous- love all the texturing and very many thanks for the how to. Deets now bookmarked to refr back to in the future. Nicola x
ReplyDeleteoh Terry, frosty is just so beautiful.
ReplyDeleteYour canvas really comes to life even more when all the different steps are visible. Great layering of textures/products and the snowman is fantastic. Thanks for sharing this Terry, hugs Jenny x
ReplyDeleteTerry...you should do more canvases...fabulous work! The texture of the background is amazing and wonderful!!!! Gorgeous work!!!
ReplyDeleteI have some of those canvases and I have to say....you inspire me :) Thanks for the step by step, because I think with that, I could do this.
ReplyDeleteI'm so delighted to have this tutorial to refer to. Thanks so much for the inspiration. I can hardly wait to try it! ((hugs))
ReplyDeleteTerry, I used this idea and created two beautiful canvases (one done by my 6 yr old neice). However I gave them away without taking a picture :(. I am going to try to borrow them back and get photos because I was shocked that I could produce anything like that, and it's all thanks to you and the'Boutique'.
ReplyDelete