
I’m going to show you a simple little treasure box made from some commercial packaging that would ordinarily be thrown away. You can adapt and adjust this basic idea to any little mint box, gift box or thrift store find…

It’s a sturdy, but unattractive little metal box! The plain white base allowed me to use it without spray painting. If you don’t like the color of the base, put a few light coats of enamel spray paint onto the uncovered portions…

Cut a piece of thin foam or, in this case, some styrofoam that is a little smaller than the top. Because I didn’t have any spongy foam, I dug around until I found this styrofoam sheet in some packaging! A standard rubber foam would be my first preference. I placed the box on top of the foam and traced the base size onto it before cutting it with some Tim Holtz crafting scissors that can cut anything with ease…

Before adhering the foam to the box lid, trace a line on your fabric about 1/2″ larger than the foam and cut it out. Attach the foam to the lid with double sided tape and then run a strong, liquid adhesive around the edge of the lid. Center the fabric and adhere the edges to the sides of the top. Ease the fabric into a nearly flat surface around the curves. It was necessary for me to hold the edges in place with my hands encircling the box for a few minutes. Let it dry thoroughly…

Trace the bottom of the box onto some scraps of pretty paper. Cut them out and adhere to the inside top and bottom with double sided tape…

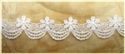
I ran some beautiful white lace trim around the lid, overlapping the edges. Linda stocks some of the all-time prettiest trims in The Funkie Junkie Boutique at amazing prices, so have a look! A bow of hand dyed seam binding, an exuberant paper flower, three white flower buds (much whiter IRL) and some tiny rose leaves that my friend Colleen Dietrich sent as part of a luscious crafting gift, were tucked under the buds for contrast! Now I’m searching for some other metal boxes that I can re-purpose!! I’ve got an idea for another project!
Thanks for joining me and I hope you have a wonderful day!
((hugs))
Rebecca
 |  |  |  |  |
 |  |

What a fantastic use for this little box. Love the padded top and that lace trim. Jenny x
ReplyDeleteThank you Jenny~ I am now scouring the surrounds for discarded boxes ;)
DeleteGorgeous! Perfect for a Mother's Day present.
ReplyDeleteHugs
xx
Thanks Hettie~ now you have me thinking about making it into a customized sewing kit!! Thanks!
DeleteAdorable altered tin!
ReplyDeleteAlison x
Thanks Alison...the first of many!
DeleteReally cute idea, I like it a lot
ReplyDeleteThanks Claudine~ I appreciate your comment!
DeleteAbsolutely stunning....wonderful transformation of a simple tin. TFS and hugs
ReplyDeleteAnnie x
Thanks so much Annie~ so nice of you!
DeleteBeautiful altered tin.I would like to attempt this.
ReplyDeleteThanks Marci~ give it a go and let me know if I can be of help!
DeleteLove your beautiful altered tin Rebecca! So fun to keep some treasures in! I might have to try making some for Valentines Day with some lovely chocolates in them! Or crafting goodies! :)
ReplyDeleteLove your idea Jill!! Thanks
DeleteI am so in love with your pretty tin, Rebecca! Using the scrap styrofoam to form the top is inspired! This would be a perfect little present or anyone on your gift list!
ReplyDeleteTank you so much for sharing!
Hugs,
Nancy
So kind of you Kelly~
ReplyDeleteThanks Nancy~ styrofoam was the default material!
ReplyDelete