
Hello everyone and welcome. Rebecca here with this fortnight's Friday Focus on metal charms and embellishments. There are so many new and wonderful metals for sale at The Funkie Junkie Boutique and the good news is that they are 15% off for the next two weeks!
I'm running late with this project. I thought summer was supposed to be laid back, relaxing and restful, but life right now is calling me to run in a few directions at once, so I'm going to share a nearly finished project and some tips I learned along the way. I've had a small wooden box, with dovetailed joins that I have kept for a few years, sure that a project would pop up for it one of these days and last week I started to convert the bare wood, footless, unfinished interior into a trinket box. It contained chocolates and were a gift from Bernard, along with some red roses, waiting for me in our cabin when we took the Queen Mary 2 across the pond (the Atlantic pond that is). Not being drawn to cruising, I wasn't sure how it was going to be aboard a small floating town for more than a week. Before they slipped the moorings in New York harbor, I was in love with this ship and the idea of the crossing!!
Here’s the starting point…

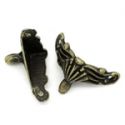
I had recently ordered some elegant little metal feet from the Funkie Junkie Boutique and the proportions were going to be just right for this box…not too big and not too small. The metal finish however, wouldn't do for this white/cream, vintage loving crafter. The first step was to paint the feet with a coat of white acrylic paint. When the feet were completely dry, I took some medium grit sandpaper to the surface, removing some of the paint on the high spots, down to the metal…
I'm running late with this project. I thought summer was supposed to be laid back, relaxing and restful, but life right now is calling me to run in a few directions at once, so I'm going to share a nearly finished project and some tips I learned along the way. I've had a small wooden box, with dovetailed joins that I have kept for a few years, sure that a project would pop up for it one of these days and last week I started to convert the bare wood, footless, unfinished interior into a trinket box. It contained chocolates and were a gift from Bernard, along with some red roses, waiting for me in our cabin when we took the Queen Mary 2 across the pond (the Atlantic pond that is). Not being drawn to cruising, I wasn't sure how it was going to be aboard a small floating town for more than a week. Before they slipped the moorings in New York harbor, I was in love with this ship and the idea of the crossing!!
Here’s the starting point…

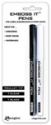
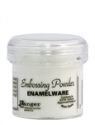
Then I used an ‘Emboss It’ pen by Ranger, over the entire exterior surface of each metal foot. The pen tip allowed me to get the sticky ink into the groves. Holding a foot with needle nosed pliers, I dipped each foot into white embossing powder and then sprinkled some coarse gold embossing powder onto the surface. Then the heat gun was applied. To prevent the chunks of gold from blowing away, I held the heat tool about 8-9″ away from the surface and as it heated up and began to melt, was able to go closer and closer. I didn't want to fully melt the chunks as I really like the lumpy, imperfect effect…
 Some white paint and white enamel shows along with areas of exposed metal and chunks of gold embossing powder. I love the look of instant age! You can see a filigree medallion that I treated the same way and haven’t used yet. I've been painting metal for some time and staining it with alcohol inks, but this is my new favorite treatment! I just love the aged enamel effect!…
Some white paint and white enamel shows along with areas of exposed metal and chunks of gold embossing powder. I love the look of instant age! You can see a filigree medallion that I treated the same way and haven’t used yet. I've been painting metal for some time and staining it with alcohol inks, but this is my new favorite treatment! I just love the aged enamel effect!… The next step was to paint every edge that might be exposed along with the inside walls of the box and the surfaces that touch each other when the box is closed. The exterior sides and top were going to be covered with paper, while the deepest recess on the inside of the bottom and top were going to be covered and didn't require paint. At first, I painted the edges white, but had a change of heart and used a very soft, pale buttermilk color.


Thanks for visiting and I my thoughts are with those of you dealing with the flooding and storming in so many parts of the country.
Sending you blessings and ((hugs)),

 |  |  |  |  |

A fantastic step by step to produce such a wonderful box Rebecca. I love the look of those feet and the way you've altered them is fantastic. Jenny x
ReplyDeleteThank you very much Jenny~ hugs, Rebecca
DeleteOh it's so beautiful!!!!
ReplyDeleteThanks kindly Dagmar. So sweet of you to leave your comment. hugs, Rebecca
DeleteA wonderful transformation Rebecca, I love the beautiful pearl edging and those gorgeous feet! x
ReplyDeleteThanks Redanne~ you are always so encouraging. Hugs, Rebecca
DeleteSuch a beautiful box! I love what you did to the feet. The whole project is fantastic!
ReplyDeleteThank you Maryanne. Your sweet comment is much appreciated. Hugs, Rebecca
DeleteWow... Great tutorial. Love the way you altered the feets. It gives a bit more dimension compared to using paint to age them.
ReplyDeleteNow looking forward to follow how you choose to finish the great box. So far it's lovely. But I'm sure you will ad something more.... Eg butterflies... Lol
Hugs from SPAIN
Thank you Mamablitger! I have the box sitting out on my table so I can't forget to finish the rest ;) hugs, Rebecca
DeleteRebecca great job and love the box and what you did to the feet very nice.
ReplyDeleteThank you Jan~ I have my heat gun at the ready, to emboss any stray metal embellishments! hugs, Rebecca
DeleteI love the box!
ReplyDeleteThank you kindly Dria. Hugs, Rebecca
DeleteA beautiful box! I love how you did the feet! I don't know if I have seen coarse gold embossing powder. Thank you for the how to! Would love to see it again when you finish.
ReplyDeleteI found the coarse gold at a stamping shop that went out of business about 5 years ago! Wish I knew of a current source, but I haven't seen it since. hugs, Rebecca
DeleteFabulous make and step by step Rebecca. TFS
ReplyDeleteAnnie x
Thanks very much Annie! hugs, Rebecca
ReplyDeleteWhat a stunning box you have created, Rebecca!! I love everything about it. You planned everything out so perfectly and the aged metal technique is fabulous!!
ReplyDeleteHugs,
Nancy