
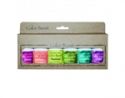
In the spotlight this time are Ken Oliver Color Bursts, a product totally new to me so this is post will show my first efforts (be gentle!!!) OK, bit of name dropping here; I got to meet the man behind the brand again at this year's UK trade show and he gave me the lowdown on Color Bursts.
Having had a quick bash I was keen to experiment more, but let's just explain what they are if (like me) you are unfamiliar with them. Color Bursts are a finely granulated powder watercolor medium which come in easy to handle bottles with small nozzles(that's important). They are concentrated pigments so a little truly goes a very long way.
Now I'm going to break this focus into two parts, as you'll have seen from the title, basically because I got carried away! Today, let's start basic... you'll need your choice of Color Bursts, a stencil, watercolor paper, a water spray and clean tissue, oh and grab a large coffee to sustain you...

(click on each image for a close up)
Lay your stencil over one piece of paper and sprinkle tiny amounts of dry powder over; it's seriously concentrated and you'll want to put it in the right areas on your design, so that's why the fine nozzle is important.

Spray a fine mist of water over the stencil and lift it away.

With one gorgeous pattern revealed lay your stencil ink down on another piece of paper.

Dab your tissue over the stencil to push the color onto the paper and lift away.

I got greedy and repeated this process on a third piece of paper. As you get the smallest amounts left you can help the color spread by misting it with water.

Heat all three pieces with your heat gun and voila! Three fabulous backgrounds ready to go.

Want to see what I created with the first two? Unusually, I came over all CAS on these!!!...


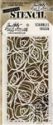
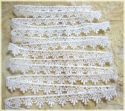
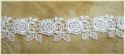
On this second one I added some of Linda's Venise Lace, and yes, you can color the lace with Color Bursts to match your background!!!


So that's the basic 'sprinkle and spritz' technique in action. Now for some watercoloring. I'm no artist and I'm a bit of a control freak so I went with stamped images (Archival Ink as it's waterproof) and machine stitching to control the color this time. Start by 'drawing' lines of water along the stitching with a paint brush.

I diluted my Color Bursts by putting a small amount of each onto a daisy palette and adding water. Paint lines of each chosen color onto the wet lines, allowing the colors to bleed together a little before drying with your heat gun. I went with too similar and one contrasting color to prevent muddying.

Now add water to the stamped areas, drawing the brush outside the stamped lines.

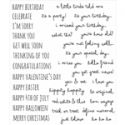
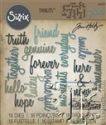
Paint your three colors onto those stamped wet areas, working from the bottom up and again, allowing them to bleed together a little. When you're happy with the finished look dry again and add a sentiment if required.

Here are the finished cards (with close ups) and you can see they required little work to finish off.


And of course there's still time to link your own layered creations to the current 'Layer it Up!' challenge for a chance to win one of several prizes.
For now I hope you have a wonderful weekend and, whatever you're up to, take care of yourselves.
Jenny xxx
 |  |  |  |  |
 |  |  | 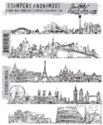 |  |

Great cards, Jenny! Specially love the cityscapes cards, beautiful stamping and vibrant colours - so enough for fabulous CAS creations ;)
ReplyDeleteYAY! The queen of CAS approves!!! I'm so thrilled Ksenija! Thank you so much. Jenny x
DeleteOh what a fabulous tutorial Jenny, I wondered how you'd created the stitched scenic ones and I love your perfect CAS one...so beautiful, fabulous effects on all!! Ruth xx
ReplyDeleteThank you Ruth! It was so much fun playing with these awesome little bottles of colour! Jenny x
DeleteWow Jenny, I love the three different looks you achieved using the Bursts and the stencil...gorgeous!! Wonderful tutorial. hugs :)
ReplyDeleteThank you so much Pamellia! Jenny x
DeleteBeautiful! Love the variety of techniques and art you created with the bursts! The stenciled flowers are gorgeous and the water colored skyline gorgeous!
ReplyDeleteThank you so much Suzanne! Jenny x
DeleteI've been toying with the idea of getting these. I think you've shown me that I must. I can't wait to see part two.
ReplyDeleteThey are huge fun Jess and so easy to use! Can't wait to see what you create with yours. Jenny x
DeleteBoth sets of cards are beautiful Jenny. I have to say, I think I prefer the more 'controlled' way of using the Color Bursts - the cityscapes look fantastic! Anne xx
ReplyDeleteThanks so much Anne. I did enjoy creating those and making the colour go where I wanted, though you'll see next week, not all went according to plan!!! Jenny x
Deletecool work Jenny - lots of fun! Looks brilliant x
ReplyDeleteThank you so much Rachel. Jenny x
DeleteGreat experiments with those colour bursts Jenny and the results are fabulous, - amazing how many different looks you have managed to achieve with them, and it really looks as if you had great fun in the process!
ReplyDeleteThank you so much Astrid. It was great fun! Jenny x
DeleteFabulous experiments Jenny ! My colourbursts are sitting staring at me so maybe it's time to give them an airing ! Sue C x
ReplyDeleteThank you so much Sue. Definitely time to play for you too! Jenny x
DeleteWhat a fabulous Friday Focus, Jenny!! I can't wait to try out the color bursts!
ReplyDeleteHugs,
Nancy
Thank you so much Nancy. Looking forward to seeing what you create with them! Jenny x
DeleteThis looks like it was fun! I adore water color techniques, so maybe once I get settled, I'll be able to give these a go. You explained how they work so well, and you have me intrigued!
ReplyDeleteThank you so much Kathy! They are indeed fun to play with and so easy to use. Jenny x
DeleteLovely work Jenny and a great tutorial (part 1) will be tuning in for part two! X
ReplyDeleteThank you so much Toni! Really turning up the heat for the second part. Jenny x
DeleteThanks for sharing. I just attended a Stamping Spring Fling at Mesa, AZ; I am sure it is the same Ken Oliver who was doing demos - great ideas!
ReplyDeleteAs far as I know there's only one Ken Oliver so my guess is you're right Dorothy! Hope you had a great time and thank you so much for your lovely comment. Jenny x
DeleteThese are stunning Jenny! Loved the step by step. The stitched cityscapes are AWESOME! Thanks for sharing. :)
ReplyDeleteThank you so much Zoe! Those Cityscapes are real favourites and were just perfect for this design. Jenny x
DeleteWhat a fabulous tutorial and so many gorgeous creations too. I have Brusho's and now I want to play with them. The stencil idea alone was an awesome technique and then you throw some stitching into the mix too! If you wanted to inspire us you did an awesome job Jenny - thank you so much Karen x
ReplyDeleteThank you too Karen! It's fantastic to know you feel inspired to play now. Jenny x
DeleteLove what you have created and those scenic cards are so beautiful too! Love how you work CAS xx
ReplyDeleteLOL, me and CAS are far from great friends Georgie but it was fun to try! Thank you so much. Jenny x
DeleteWhat a wonderful result. They all look great.
ReplyDeleteGoing to give it a try. Very inspiring.
Thank you so much Anneke. Jenny x
DeleteI have the set of powders from the UK called Brushos. They seem to be the same exact thing. I've had them for a number of years and they really are such fun to use. Love what you did on your trial run with the ones you have.
ReplyDeleteTo be honest I haven't tried those Susan but can definitely vouch for the amount of fun these Color Bursts are. Thank you for your lovely comment. Jenny x
DeleteA great contemporary feel to these cards ! Jenny Love how with the stencil you were able to run off three backgrounds with the same products but produce three different results . Great tute hugs x
ReplyDeleteThank you so much Amanda. Jenny x
Delete