Hello and welcome to today's step x step ! It's Sue here and as promised I'm back to show you how my Frilly project came together for the current Opposites Attract challenge. Now as my life with the Frilly and Funkie team started on the Frilly this wasn't too hard but I did have to exercise some restraint with the acrylic paint !
I've had the Wallflower stack of paper for ages and not used it so this was the perfect opportunity to dip in to it. I cut three pieces each slightly smaller than each other so that they would mat and layer up. I then distressed the edges and zipped around them with my sewing machine.
Using a Prima stencil and some Wendy Vecchi white embossing paste I spread it over the paper. I decided to leave it white to keep the colours delicate.
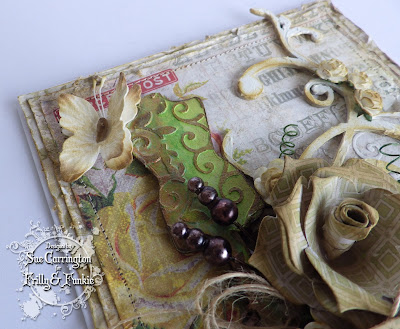
When I think Frilly, flowers are the first thing that come to mind. I've not made any roses for absolutely ages so I decided to make a trio from some more paper from the Wallflower stash. To shabby them up a little I rubbed some Tree Branch Archival ink over the edges.
Swirls are also something that I associate with the Frilly side and to add a little texture I used Wendy Vecchi's Crackle Paste. When it was dry I rubbed some Tree Branch Archival ink around the edges but left the swirl mainly white.
I used the same Prima stencil with more Wendy Vecchi white embossing paste on this little MDF dress form.
I painted the dress form using Art Alchemy acrylic paints, then decided that the colours were way too bright to be Frilly so I rubbed white acrylic paint over it to knock the colour back and also rubbed brown acrylic paint over the raised areas of the embossing paste.
I also dug out some little white paper roses and wrapped the wires around a small paint brush and rubbed Tree Branch Archival ink over the flowers.
The stick pins started life as pearls and I've changed their colour using Espresso Alcohol ink. The little butterfly is by Petaloo and I've used more Tree Branch Archival ink to shabby it up.
To finish off I slotted in some twine twirls and loops in between the roses.
Just one last photo to share the dimension on this card, I shall definitely need to make a box for this one !
I hope you've enjoyed today's step x step, you still have time to explore your opposite side with us !


Beautiful card! I loved seeing the step by step layering to create the lovely design.
ReplyDeleteLovely card Sue!! Thanks for tutorial!!
ReplyDeleteWonderful use of those gorgeous Wallflower papers Sue, your card is beautiful! x
ReplyDeleteas usual Sue...this is stunning!
ReplyDeleteGreat process steps. TFS Sue xxx
ReplyDeleteYour card is stunning, Sue!! I love your handmade roses and all the wonderful swirls!!
ReplyDeleteHugs,
Nancy