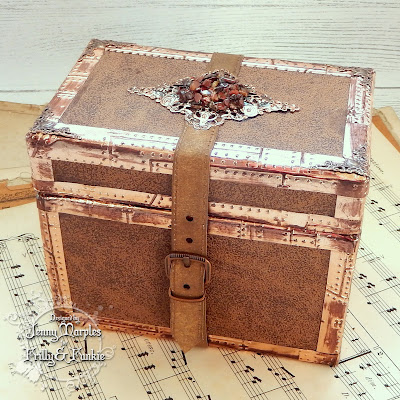
This vintage style travel trunk opens to reveal sectioned drawers and pockets all ready to hold everything the seasoned traveller could require on a long trip abroad.
Here's how it came together;
The set of three drawers were cut using matboard and Eileen Hull's Stacking Drawers die set. The outer 'sleeve' wraps around easily as all the pieces are pre-scored by the die. When assembling the drawers I found it worked best to put the bottom pieces on the inside for a better fit.
The outer trunk was cut using matboard and Eileen Hull's Treasure Box die set. The pieces are also pre-scored and easy to assemble and you'll see this time I put the bottom pieces on the outside.
You'll see from the photo above how the assembled bare matboard drawers fit together inside the box with room to spare for the inclusion of handles or pulls if required.
Each of the drawer pieces were painted once assembled. 'Stormy Sky' Distress Paint is perfect for this. I then aged them by blending a little 'Potting Soil' Archival Ink along each of the edges.
To prevent the painted surfaces sticking to each other and make the drawers easier to slide in and out I rubbed a plain wax candle over them.
For my travel trunk I covered the box in a faux suede fabric - having done this once a strong suggestion would be to apply your choice of finish, be it fabric or patterned paper, to both sides of your matboard before cutting the pieces with the die as this way you can assemble it pre-decorated.
Above you can see how the drawers sleeves fit snuggly in place inside the decorated box. I chose to use glue on the edges of the sleeves to ensure they were firmly secured in place.
More fabric was added to the outside of the drawers. Again I would suggest you add your choice of fabric or patterned paper to the matboard before cutting these pieces to make assembly much easier and quicker.
The edges were covered in strips cut from Tim Holtz 'Rose Gold' Metallic Kraft Stock and aged with more 'Potting Soil' Archival Ink. By using Tim Holtz 3D Texture Fades 'Foundry' Embossing Folder you can achieve a more realistic look to the Kraft Stock.
To finish the travel trunk I cut hinges using the Treasure Box die set and created a belt to hold the box closed, attaching them with Tim Holtz Long Fasteners. A pocket was added to the inside of the box lid to hold travel documentation; you could use Tim Holtz 'Stitched Slots' Thinlits die set and Tim Holtz 'Treat Bag' Thinlits die set to create these as both fit well.
On the top of the trunk I added a beautiful Copper Tone Filigree Metal Piece from The Funkie Junkie Boutique, filling it with gemstone chips. Linda also stocks gorgeous Antiqued Copper Tiny Triangle Filigree Pieces which worked perfectly in the corners.
Here are some close ups to show more of the details from the finished travel trunk;
I hope you've enjoyed seeing today's Saturday Showcase tutorial and have learned more about how these die sets work beautifully together. Don't forget there's still time to enter the current Frilly and Funkie challenge 'Winter Blues' HERE.
Have a great weekend!
Jenny xxx
Links to the products used from The Funkie Junkie Boutique;


Wow Jenny! What a stunning make with those two fabulous dies. I love the finishing touches to the trunk - the metal edging and filigree embellishments. A great tutorial - thank you x
ReplyDeleteSuch amazing new dies from Eileen H and I just adore the trunk you have created x Wonderful details x Like Jennie I love the metal edgings and filgree emebellishments.
ReplyDeleteTFS and huge hugs
Annie x
You are so clever! This is wonderful and I love the faux suede!
ReplyDeleteA MARVEL TO BEHOLD!♡ I love everything about it!♡ Thank you for the tips & tutorial Jenny. HUGS♡
ReplyDeleteGorgeous love the edging and faux suede, very classy. ❤️❤️
ReplyDeleteFaux suede! I was wandering what that was 😀 This is a stunning project Jenny- so well made and clever. The gems on top are the finishing touch!
ReplyDeleteBeautiful showcase, Jenny! Love all of the vintage touches!
ReplyDeleteThis project is such a jaw dropper! All the details really are just perfect!
ReplyDeleteJenny, this is a fabulous trunk and your excellent tutorial made it look so easy to put together. I love the finishes you added to the exterior. Great project!
ReplyDeleteThis is amazing!
ReplyDeleteWOW! This is AMAZING! It looks like it took a lot of time to create!
ReplyDeleteI have got to have this die. Your choices were amazing.
ReplyDeleteJust now getting a peek at this...
ReplyDeleteTHIS. DIE.... I say right here, right now; this is on my "JUST BUY THE THING!" List.
I have a stack of old trunks- all interesting histories- & book boxes that hold all my craft supplies, yarns, materials, trash recycles, wood, etc.
The trunk collection is something my younger kids look forward to getting from me when I'm old....ER.... much oldER!
I can think of tons of ways to present gifts throughout the year with this die set- and then some!
Jenny, you knocked this clear of the park! That trunk surely made you into an EXCELLENT Salesperson: I'm SOLD on it!!!
love ur style, Girl... & love YOU, too!!!
Awesome! Love the tutorial and your handsome travel trunk design! Beautiful details with a stunning focal point on top!
ReplyDeleteLove love love this....brilliant
ReplyDelete