(click on any of the images to get a closer look)
To start grab a sheet of each colour Kraft Stock in the Metallic Confections pack - they come in all of these delicious shades;
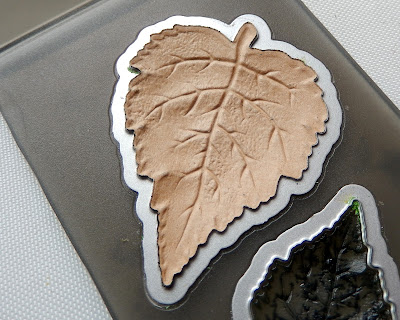
Cut a piece of Kraft Stock large enough to fit over the leaves in the 3D Impresslits Embossing Folder and place it shiny side down on the cutting side.
Run through your embossing machine following the layering instructions on the 3D Impresslits packaging. Release your leaves from the folder and marvel at the incredible intricacy of the embossed design and die cutting.
Now cover the leaves in a thin layer of Dina Wakley Media 'Black' Acrylic Paint using a small paint brush.
When the paint is partially dry rub with a soft cloth to remove the excess. The longer you leave the paint the less you will remove so try experimenting to get the look you are happy with.
Once the paint has been removed you may find you have slightly flattened your leaves. This is easily rectified by replacing them in the Embossing Folder and pressing down gently on the reverse side with your thumbs to re-emboss them.
You will now have beautiful aged leaves ready to use on your projects. Here's how the other colours look when you use the same process on them.
Now to add them to a project (or two). For this first card I added some of the leaves to a plain white background embossed with the 3D Embossing Folder 'Elegant'. It's a good idea to add dimensional foam tape to the underside of the leaves to support them and prevent flattening the design when posting. You'll see below that I also added some twisted wire tendrils, a few self adhesive gems, two Tim Holtz Ideaology Adornments Butterflies (altered with white paint in the same way as the leaves were done) and a sentiment from Tim's 'Life Quotes' stamp set.
Here are a couple of close ups;
The second card picks up on the current challenge theme 'It's Heating Up!' incorporating leaves with warmer colours over a background smooshed with Dina Wakley Media Acrylic Paint (Buff and Sand) Tim Holtz 'Architecture' stamp and a 'Tattered Butterfly' die cut. There is an Ideaology Clockhand in the centre of the butterfly and a Small Talk sentiment, and to finish the card I mounted it on more Metallic Kraft Stock (this time in Copper).
Here are a couple of close ups of this one;
Thanks for visiting to catch today's Saturday Showcase tutorial. Don't forget there's still time to enter the current Funkie Junkie Boutique Blog challenge 'It's Heating Up!'
Jenny xxx
Links to the products used from The Funkie Junkie Boutique;
Sizzix 3-D Impresslits Chapter 2 Embossing Folder - Leaf 663293
Tim Holtz Idea-ology Adornments Butterflies
Tim Holtz Idea-ology 8 x 8 Metallic 2 Kraft Stock - Rose Gold & Copper TH93780


Jenny, these are lovely. Might just need to spend some money!
ReplyDeleteWow, those leaves are gorgeous. Beautiful cards too.
ReplyDeleteThese are lovely - just wondering what you used to glue them on x
ReplyDeleteSo glad you like them Jacqui. I just used some foam dimensional tape underneath them to support the embossing but you could also use silicone glue or a hot glue gun to do exactly the same. Hope that helps :)
DeleteAwesome creations, these leaves look like dimensional molded objects!
ReplyDeleteGorgeous!!!
ReplyDeleteFantastic, Jenny.... I can see these in some lovely autumnal projects!
ReplyDeleteWow!!! These leaves look so so real! Just Wow! They are all beautiful!
ReplyDeleteBeautiful cards Jenny! Love how you showed samples of the leaves with and without your aging technique. Great tutorial.
ReplyDeleteWow, this is gorgeous!!!
ReplyDeleteLove these leaves and your samples with them Jenny.
Fabulous Jenny! Love those gorgeous leaves x
ReplyDeleteA beautiful display of aged foiled leaves using my favorite embossing folder! The details of the leaves really show up with the addition of the black paint. Your cards you made with them are elegant and hint at cooler days ahead! Hugs!
ReplyDeleteGorgeous! I love the metallic with the autumn leaves!
ReplyDeleteYour foiled leaves are stunning Jenny x I may just have to add them to my wishlist xx TFS and huge hugs
ReplyDeleteAnnie xx