
Hello friends! I am back on board after spending two wonderful months wandering around the wilds of Alaska and Canada. Many thanks to Linda and all the design team for filling in for me while I was rejuvenating my soul with the sights of this beautiful land.
Today's spotlight shines on an Italian company, Stamperia. Their gorgeous products are a favorite of mine so I am delighted to share tutorials to make three different cards with three different lines from Stamperia. You can find many Stamperia products at The Funkie Junkie Boutique, so be sure to stop by and take a look at all the loveliness!


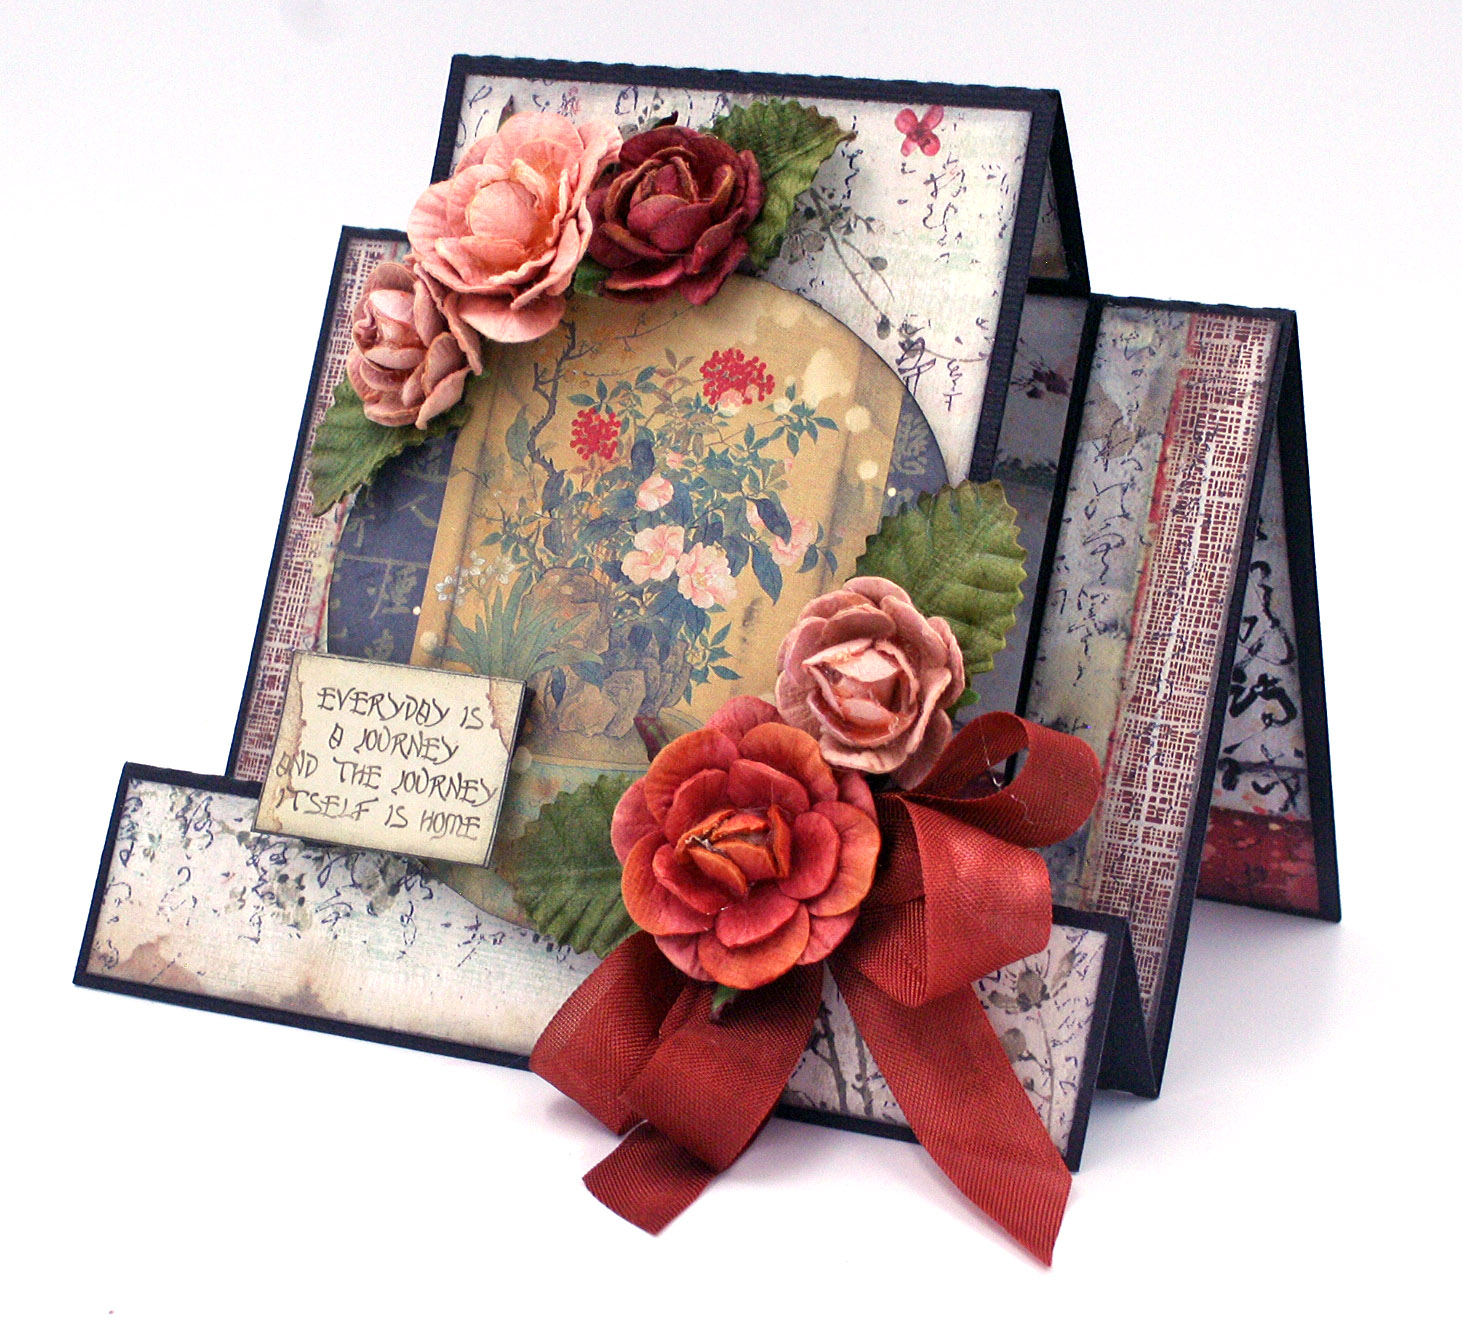
Let's kick things off with one of my favorite card types, the step card. I love this card because it stands on its own and has so much dimension. I used Stamperia's Oriental Garden to make this card. I have always loved the unique imagery of Oriental art and this collection does not disappoint.
Step Card with Stamperia's Oriental Garden
TUTORIAL - Step Card
1. Cut a step card base, 5 7/8" x 11" from black cardstock. Click this link, downloadable template, to download the card template so that you can read the measurements. (If you have a Silhouette Cameo or similar machine you can set the card up on the machine to cut for you and then you'll always have the card base ready to use for other cards and you can adjust the size to your requirements. Silhouette has a template that you can purchase also.)

The step card looks like this when folded.

2. Locate the paper shown in the photograph below. Cut off the white edges all around the page. Then cut from the bottom sides as shown in the photograph 2 - 1" x 4" strips, from the bottom , a 5 3/4" x 1 1/8" strip and then a rectangle 3 3/8" x 4 3/8". (All measurements in my tutorials are width x height.) Ink the edges as desired with Distress Black Soot.

3. Cut out the circle and sentiment shown in the photo.

4. Adhere the pieces cut in Step 2 as shown. The shorter strips go on the side strips of the fold mechanism, the rectangle goes on the center panel with the longer strip at the bottom.

5. Add dimensional foam to pop up the circle and adhere over the center panel being sure NOT to adhere any part of the circle to the side strips.

6. Now let's work on the inside of the card. Cut a piece 5 7/8" x 4 1/8" and a piece 3 3/8" x 1 1/8" and adhere as shown in the below photo to the bottom panel of the card. Add a silver medallion in the center as shown.

7. Oriental Garden includes a nice selection of sentiments, cut one out and adhere to the front left panel as shown. Use foam tape to pop up the sentiment. And a pretty bow tied from seam binding or whatever you wish. Now the card is ready and is relatively flat so that it can be easily mailed.

Well, you know me, I put flowers on everything so this is how I chose to finish up the card.


Supplies from The Funkie Junkie Boutique
Stamperia Oriental Garden Collection
Ranger Adhesive Foam Roll
Other Products
Black Cardstock
Seam Binding
Petaloo Roses
Card with Stamperia's Grand Hotel

TUTORIAL - A Simple Layered Card
1. Begin by cutting a cream card base 11 1/4" x 7 1/2", score at 5 5/8". Then cut a rectangle from the blue floral shown 5 3/8" x 7 1/4". Cut from the red striped paper a piece 4 3/8" x 6 1/4" (I cut mine with a scalloped die). Next trim the cut-apart shown from the page of cut-aparts to 3 1/2" x 5 1/2".

2. Wrap red twin around the cut-apart and tie on a small charm as shown.

3. Adhere the red striped paper to the blue floral centering. Then use foam tape or cardboard on the back of the cut-apart to pop up and adhere onto the red striped paper, centering.

4. Adhere the assembly from step 3 to the front of the cream card base. Add some tiny flowers over the twine as shown.


5. Cut a border 1 3/4" x 7 1/2" and adhere inside the card adjacent to the score line.

Nice, easy to make card, easy to mail, score!
Supplies from The Funkie Junkie Boutique
Small Charm - There's a great selection of charms in the Boutique
Ranger Adhesive Foam Roll
Other Supplies
Cream Cardstock
Tiny Red Flowers
Masculine Card with Stamperia's Cosmos
Cosmos is a beautiful collection of images that evoke the night sky and the creatures that roam in the evening. It appeals to the side of me that loves nature.

1. Begin by cutting a khaki colored card base 10 1/4" x 6 1/4". Score at 5 1/8". Cut out the owl cut-apart, 3 1/4" x 5 1/8", as shown below from the cut-apart page and a sentiment from the sentiments page.

2. Cut a piece 4 7/8" x 6" from the patterned paper shown below. Then tear from the cardstock used for the base, a piece about 4" x 5 7/8". Paint a thin line of water along where you want the cardstock to tear. This ensure that your cardstock tears where you want it to tear!

3. Pop up the owl cut-apart with foam adhesive tape and adhere to the cardstock.

4. Adhere the patterned piece from Step 2 to the front of the card base, centering. Then adhere the owl and cardstock from Step 3 over the patterned paper on the left side as shown in the photo below. Attach a Typed Token to the sentiment as shown and then adhere the sentiment on the side, just under the edge of the owl cut-apart.

5. Cut a piece of cream cardstock for the inside 4 3/4" x 4 1/2"v and adhere to the right side. Cut a border from the back of the last page in the paper pack 4 3/4" x 1 3/8". Add a piece of washi tape over the border 4 3/4" long. Adhere two Typed Tokens as shown to the washi tape.

All finished.

Supplies From The Funkie Junkie Boutique
Ranger Adhesive Foam Roll
Washi Tape - choose from the many selections in the store
Other Supplies
Khaki Cardstock
Cream Cardstock
I hope you've been inspired by this look at Stamperia's beautiful papers. In addition to fabulous papers, Stamperia also has beautifully detailed stamps, rice papers and mixed media products. Visit The Funkie Junkie Boutique to see these great collections.
You still have time to join in our current challenge, Bits and Bobs ending at midnight on September 10th. I hope to see your entry!
xxoxo Maggi
Gorgeous cards! Love how you have used the various collections and shown how lovely the Stamperia can be used!
ReplyDeleteMaggi, each of these cards is beautiful; the Stamperia line is absolutely gorgeous, and you have showcased so many of them on each of your wonderful cards. I'm so happy you've shared the template for the step card, as I've always wanted to make one of these. I know you classify your last card with that fabulous owl as masculine, but I would love to receive it, too! Great job on this tutorial! Hugs! Sara Emily
ReplyDelete