Cec here and today is my turn for the Step X Step so I am going to show you how I made the Tussie Mussie for the Christmas Preparations challenge.
I started with a 10" square of paintable wallpaper. I picked this up at a local paint and wallpaper store and have a large roll for under $20. You can see just how deeply embossed it is. I suggest you try to find an all-over pattern such as this one rather than one that is in a grid. You can paint it but I chose to leave it white. You could also use a square of patterned card stock.
On the back side, add a strip of double-sided tape down one edge, making sure to butt it right up to the edge. Grab your square by the corner opposite your taped edge and roll into a cone, making sure you get a point and once you are happy with the shape, stick the taped edge to the cone. If your seam isn't perfect, don't worry because when you hang your Tussie Mussie the seam is going to be at the back.
Next I trimmed the cone so that the top was flat. If you are using double-sided patterned card stock, you might choose not to trim the top down as I did. I punched two holes on either side of the top and added a ribbon for a hanger, knotting each end on the inside.
The next step was to pull out a variety of venise laces and other trims and decorate the cone. I added lace to the inside of the top facing it upwards and then added some deep venise lace and a row of pearls to the top. Other laces and trims were added at intervals down the length of the Tussie Mussie as you can see in the finished product. Some laces face up and some down. Once the laces were in place, I tucked a bead dangle to hang from the bottom.
Next I took a Melissa Frances cherub and painted it gold with some craft paint. This was glued to the top on the side opposite the seam (the front). Then I began to make other elements to put inside the tussie mussie.
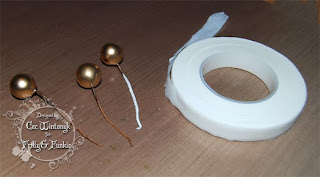
The gold berries came in a spray so I removed three of them and wrapped them in white floral tape and then I wrapped the three together.
I found some free sheet music online, sized it on the computer and printed it. Then I distressed it with my scissors and inked it with some Vintage Photo Distress Ink before I rolled it into a tube.
I cut a length of gold mes ribbon, pinched the bottom together and wrapped some metallic wire around it to make a fan shape.
The flower was made from layers of crinoline and tulle cut with the Tim Holtz Tattered Florals die. A pearl brad was added to the centre.
To finish the Tussie Mussie, I filled it with shredded curly paper and then glued in all the elements I made as well as some feathers and pearl sprays from my stash. I hope you will give one of these a try because they are quite easy to make and can me decorated and filled in numerous ways. This one is going to hang on my Christmas tree and fill one of the pesky bare spots because it is so long. You can make your Tussie Mussie whatever length you want.
The following products from The Funkie Junkie Boutique were used to create this project:


This is such a great idea Cec. Love that you have used wallpaper offcuts as I'm sure so many of us can get access to these and they look rather strong. Jenny x
ReplyDeleteAdorable project! Hope I can find time to make one!
ReplyDeleteSo pretty! What a lovely make.
ReplyDeleteAlison x
This is so pretty. Cones are such a beautiful Victorian style decoration. This one is so very lovely!
ReplyDeletethis is gorgeous and love the festive feel x
ReplyDeleteWhat a fabulous make. A gift to treasure too. Hugs Rita xxx
ReplyDeleteThis came out so beautiful! Thanks for the step by step.
ReplyDeleteWhat a great ornament and using wallpaper really makes it perfect
ReplyDeleteI love tussy mussies and this one turned out beautifully~ best use for anaglypta I've ever seen! and I love the layered fabric flower!!
ReplyDelete