

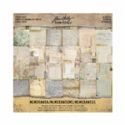
Hi there. It is Cec here and today I am presenting the Saturday Showcase featuring the wonderfully vintage Memoranda paper pad from Tim Holtz.
I thought it might be fun to make an accordion mini album that could be mistaken for a little junk journal in the making. I sure hope I haven't confused you but as you walk through this project with me I think you will understand why I could not decide what it really is.
This little album is about 3" square and 2" thick at the thickest part and before I share the instructions for constructing the base, here is a little walk through. I think the most fun part of going through this little album when it is untied is that because it is an accordion, it is never ending.

This is one of the covers and since I wanted it to lie flat when it was completely open I decorated it very simply:
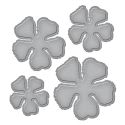
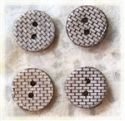
- Flower made from Kraft Core (Tim Holtz) cut from the Shabby Posies die (Tammy Tutterow) with a button for a centre
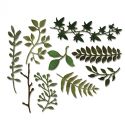
- Leaves cut from Kraft Core (Tim Holtz) cut from Garden Greens die (Tim Holtz)
- Venise lace
- Chitchat sticker (Tim Holtz)
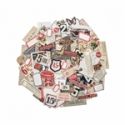
- Ephemera (Tim Holtz)

- Triangular tuck spot
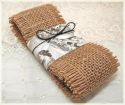
- Hand cut tag with burlap string at top. The back is left plain so it can be used as a journaling spot
- Pocket trimmed on an angle and glued on right side
- Quote chip (Tim Holtz) inked with Vintage Photo DI
- Two rectangular journaling spots

- Rectangular tuck spot with carved coconut shell button
- Rectangular journaling spot with punched trim
- Flip-up that can hold more journaling or a small photo
- Ticket from my old stash (Tim Holtz)
- Punched circle to hold the flip-up down when closed

- Half circle tuck spot with venise lace
- Rectangular journaling spot
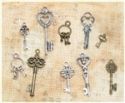
- Pocket with metal key
- Little folded book with journaling spot inside

- Rectangular side tuck spot
- Rectangular journaling spot with punched trim
- Triangular tuck spot
- Hand cut tag with Ephemera topper (Tim Holtz)
- Flower made from Memoranda paper (Tim Holtz) cut from the Shabby Posies die (Tammy Tutterow) with a carved coconut shell button for a centre


- Pocket trimmed on an angle and glued on right side
- Quote chip (Tim Holtz) inked with Vintage Photo DI
- Hand cut tag with Ephemera topper (Tim Holtz)
- Band tuck spot
- Little folded book with journaling spot inside

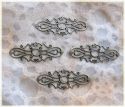
- Rectangular tuck spot with filigree metal embellishment
- Rectangular journaling spot
- Triangular tuck spot
- Hand cut tag with burlap string at top

- Flip-up that can hold more journaling or a small photo
- Ticket from my old stash (Tim Holtz)
- Punched circle to hold the flip-up down when closed
- Chevron tuck spot
- Rectangular journaling spot with punched trim

- Pocket tuck spot
- Hand cut tag with Ephemera topper (Tim Holtz)
- Half circle tuck spot with flower made from Memoranda paper (Tim Holtz) cut from the Shabby Posies die (Tammy Tutterow) with a button for a centre
- Rectangular journaling spots

- Pocket tuck spot with metal key
- Little folded book with journaling spot inside
- Rectangular tuck spot
- Hand cut tag with burlap string at top
These instructions are just meant to be guidelines and can be altered to suit you. My husband kindly made a template for you to follow. If you have a printer that will print on legal sized paper (8 1/2" x 14"), you can print this to size if you wish since he made it to scale.

- Create the accordion base from a 12" x 12" piece of kraft card stock or whatever heavy weight card stock that size you choose.

- Cut card stock into three strips 4" x 12" and score each piece on the short side at 1" and on the long side at 3", 6" and 9".
- Clip from the bottom up to the 1" score line on each of the folds at 3", 6" and 9". Now you will be left with little flaps that can be turned into pockets.
- On at least two of the strips, cut away the bottom right section as shown in grey.
- Glue the remaining portion of this section with the bottom cut away to the corresponding section on the left side of the second strip.

- Add the third strip in the same manner as the second strip.
- Starting with the first strip, fold on all the score lines as indicated by the dashed lines making sure to alternate mountain and valley folds. You should now have an accordion folded strip about 30" long with a mountain fold at each end.
- Mark the two end panels as covers and leave alone for now. The pocket flaps on each end should be folded to the back.
To Finish:
- Decorate each remaining panel and create inserts.
- Cut a background piece of Memoranda paper 2 7/8" square for each panel, distress the edges and ink with Vintage Photo Distress Ink.
- Create pockets and tuck spots on each panel, decorating everything with Memoranda paper. At this point I decided I didn't want little pockets on every panel so I removed some and replaced them with a variety of tuck spots.
- Turn the accordion over and decorate each panel on side two, including the back sides of the two covers panels.
- Add a strip of ribbon centred across each cover panel. These will act as ties to hold the album closed and the length of ribbon will depend on whether you want to make bows or knots as I did.
- Cut two pieces of chipboard 3 1/4" x 3 1/4" and adhere to cover panels over the ribbon.
- Decorate the covers.
If you want an album that is large enough to hold photos, then just adjust the size of your strips but join them together in the same manner as shown to make a larger accordion.
Despite all the pages, tuck spots and inserts, I only used a few pages from the Memoranda paper pad so watch for more projects from me featuring this fabulous paper.
 |  |  |  |  |  |
 |  |  |  |  |  |
 |  |  |  |  |  |
 |  |  |  |

Oh Cec, what a great, amazig work, there are so many creative ideas in this album! Thanks and thanks also to your good husband.
ReplyDeleteThis is so stinking cute Cec! Thank the hubby for creating the template! This is a treasure indeed!
ReplyDeleteLove, love, love all the clever tucks and pockets in this gorgeous mini album Cec! What a ideal size for storing precious memories in a portable fashion. Thank you for sharing a detailed tutorial xx
ReplyDeleteThanks for this great album tutorial. I really appreciate the album guidelines. What a treasure trove of crafty goodness. I love Tim's Memoranda Paper . It is my favorite. Gorgeous Cec!!! Mary Elizabeth
ReplyDeleteThank you for taking the time to show us a detail of your creation! I’m definitely going to make one for my daughter.
ReplyDeleteLove it! Beautiful Project!
ReplyDeleteGraça Estitte
Thank you!
ReplyDeleteGraça Estitte
A gorgeous mini book Cec and I love the details both inside and out x Thank You for the great step by step
ReplyDeleteAnnie x
Wow, what a gorgeously detailed project! I love it!
ReplyDeleteBeautiful! I love the details in each and every page and the great template!
ReplyDeleteGreat tutorial and thank your husband for the template! o many lovely details!
ReplyDeleteThis is such an amazing mini Cec! I love your construction and each beautiful page design. What a treasure! Big hugs, Autumn
ReplyDeleteI do love this paper collection, and you have showcased it so perfectly with your detailed mini journal/album! Love seeing all those tuck spots and pockets; what fun! Thank you for all your hard work (and your hubby's!) on this project and well done tutorial! Hugs!
ReplyDelete