
Happy Saturday Frillies and Funkies!!! Anita Houston here, to bring you a StepxStep for making an Alcohol Inked Masterboard. Making one helps you complete many projects easily and quickly.
 |
| First, I gathered my Alcohol Ink, shook up the Mixatives very well (you should hear the little ball), and decaped all of them. I added new felt to the applicator tool and had a fresh 8.5 x 11 sheet of Glossy Cardstock ready to go. I added 2 drops each of Pitch Black and Espresso Alcohol Inks, pressing in as I squeezed the ink out for about 2 seconds each. |
 |
| I dabbed quick little marks first, then did X like moves, and then dabbed again until no more ink was showing up on the cardstock. |
 |
| I liberally applied Alcohol Blending Solution to the cardstock. You can see what happens where I applied it. It bleaches out and removes some of the other ink. It has a blueish tint where the black used to be. It looks ugly now, but just wait. |
 |
| I applied more Pitch Black and Espresso until I like the looks of it. Then I removed the old felt and added a new one. I applied Silver and Gold Mixatives in dots randomly over the cardstock. Once I loved the look, I applied a little heat with a heat gun to set things in. I call this my granite look. I just love the look, and you can use any colors to achieve this. |
 |
| I stamped a flourish image in Sepia Archival Ink. You must use a permanent ink on Glossy Cardstock or it will rub off. |
 |
| Last, I stamped the butterfly images using Jet Black Archival. |
 |
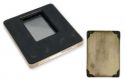
| Here is a close up of the Masterboard all ready to go. The possibilities are endless. |
 |
| I trimmed the Masterboard into 12 different sized rectangles. There is no waste. |
 |
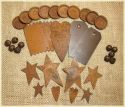
| Here are the 12 projects I made using this one 8.5 x 11 Masterboard. It took me 2.5 hours to complete all of them. I usually spend that on one project, not 12. I wish the pictures did these justice. The cut pieces of Masterboard are so shiny and striking. |
 |
| 7 ATC's (cut 2.25 x 3.25 and then mounted on Kraft) I love the Rusted Metal Bottlecaps and the Jute Ribbon from the Funkie Junkie Boutique! Mounds of charm here!!! |
 |
| 3 Small Tags (cut 3 x 1.75 and mounted) I colored the seam binding and scrunched it up to make the blue (bleached effect) really pop here. I did not add sentiments yet on these or the card below, because I am not sure what they will be used for (most likely thank you's), but they are ready to go! |
 |
| 1 Large Card (cut 4 x 4 and mounted) The Rusted Metal Hearts really bring out the gold and brown colors from the Masterboard. This card is gorgeous! |
 |
| 1 Large Tag (3 pieces cut 1 x 1 and mounted) I mounted the inchies on Glassine and Metal Foil tape to bring out the metallics in the Masterboard. The seam binding was colored and scrunched as well to match the flower. This is a thank you that I am sending a friend! |
And there you have it! So simple and fast! Talk about variation on a theme!
You can pick up Alcohol Inks at fabulous prices through the Funkie Junkie Boutique. New Alcohol Inks as well as other products are added everyday. There are now nearly 400 products in the boutique, including over 220 Tim Holtz/Ranger products at really terrific savings! And right now through the end of April, for orders of $75 or more Linda will split the shipping 50/50 with you, including international shipping. That's a heck of a deal!
Supplies:
 |  |  |  |  |
 |  |  |  |  |
 |  |  |  |  |
 |  |  |

This is totally wonderful, Anita! I really LOVE the way your masterboard looks - totally fab colors and how cool it worked for your OCC project this time too - great planning there! Love that rusted metal too - it works great with your color palette here.
ReplyDelete...thankyou for the great tutorial...amazing to get so many projects out of one piece of card and all beautifully interlinked...Mel :)
ReplyDeleteI love this! Everything you made from it turned out awesome! I love what you did! Thanks for the tutorial!
ReplyDeleteGreat tutorial and excellent results, your work is lovely.
ReplyDeleteWOW great work!! really love the large tag :) lainey x
ReplyDeleteOhohoh, Anita...
ReplyDeleteGreat idea! These are superb. I LOVE the work smarter not harder concept. :)
Thank you for the great tutorial.
Drop dead gorgeous, Anita! Awesome inspiration for me to get my grunge on! Hugs, Marcy
ReplyDeleteCool beans! Thanks for sharing that :)
ReplyDeleteI love love love this....when I first started stamping I used to do this alot but I haven't done it for a long time....you have inspired me to give it a try again!!
ReplyDeleteAbsolutely amazing. I love it!
ReplyDeleteAmazing how your granite turned out so beautiful in so many different ways!
ReplyDeleteFabulous step x step! The end result is gorgeous! Now I need to make up a little collection of masterboards!
ReplyDeleteOooooooh, how fabulous is this?!?!?! Love, love, LOVE all you've done with your background. I'm totally inspired!
ReplyDeleteFabulous tutorial. I confess, I was going, "huh?" until we got to the finished product...and then it was, "ahhhhh!" Beautiful. I've never tried this before, but I'm going to give it a go. Thanks, very much!
ReplyDeleteAbsolutely Stunning! Great tut also.
ReplyDeleteWow! This is really cool!
ReplyDeleteWow, this is truly gorgeous. Thanks for sharing an awesome tutorial. What a lot of goodies you ended up with as a result! It's stunning.
ReplyDeleteShoshi