

Hi everyone, my name is Denise and I live in Johannesburg, South Africa with my husband Andre. I work as an office manager and play action netball. I started scrapbooking in High School and my crafting evolved into altered items when I started making “keepsake boxes” as gifts for baby showers and birthdays. I find it very satisfying to present handmade gifts to friends and family. My creativity often gets boosted by my best friend, Lariska, who is a graphic designer. We craft together when possible and often 2 brains are better than one.
When I start a project the end result is very often quite removed from the original idea – mostly resulting in a better finished project. This is partially due to the fact that I don’t always have a lot of time to craft so the ideas linger for a while before becoming reality.
I love making decorations with a Christmas theme and using different techniques. I am a big fan of Tim Holtz and all his products, ideas and techniques.
My entry in the “With This Ring Challenge” was pure coincidence as the item was a gift for a friend’s bachelorette party. I was so surprised and delighted to be chosen as the challenge winner!!

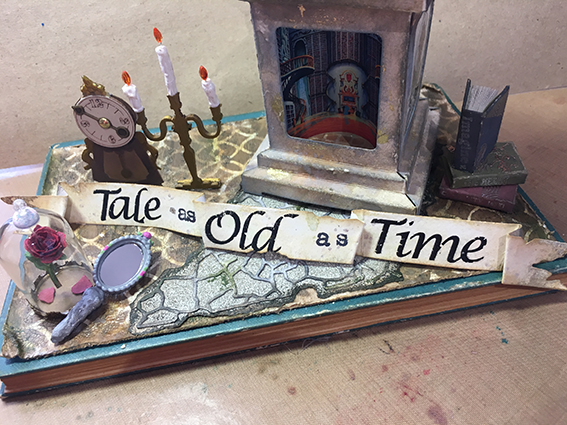
When I received the challenge theme I was unsure what I would create as I don’t really read much. I then got the idea to create a “Library”. This soon evolved into a themed library from one of my old time favourite Disney movies, Beauty and the Beast. We went to watch the remake earlier this year and I absolutely loved it.
So, herewith my Beauty and the Beast library:
PROJECT DETAILS:
I found an old book to use as a base for my project and glued the book together with multi medium. I then started with the elements for the project.
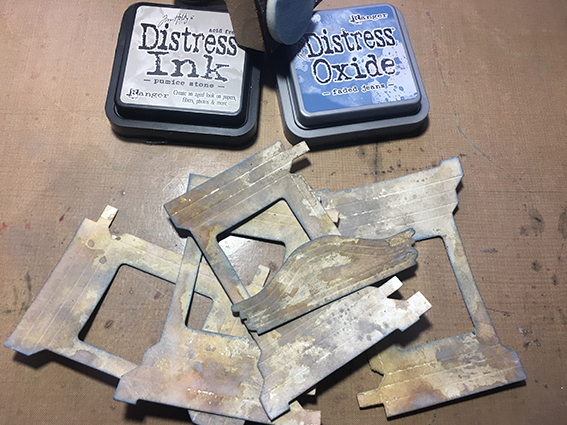
1. I began by cutting the pieces of the Luminary die and one of the pediments from a heavy watercolour paper.

2. Colour all the pieces with a mixture of Distress Oxide, Ink and Paint.

3. Coloured pieces.

4. Ink edges of all pieces with Pumice Stone DI and lightly with Faded Jeans DO.
5. I gathered supplies to start making embellishments to represent Cogsworth and Lumiere.

6. I drew the body part for the Cogsworth, then painted and cut out the chipboard piece.

7. For Lumiere I made ‘candlesticks’ from toothpicks and some hot glue which I then painted and added a teardrop shape gem on a piece of thin wire. I painted these with white and pearl paints.

8. Mini books: A. Make “book covers” from scrap pieces of cardboard covered with paper and cut paper to fill the “books” with. B. I added titles to the mini books with silver ink and stamps that had appropriate text. C. Some more detail was added by sticking nail art decals to the book covers.


9. I used a small metal trinket and some wire to create a hand mirror. This was painted silver and a piece of mirror board inserted to create the mirror effect.

10. I wanted to add some pink to the rose for the “floating rose” so I used Seedless Preserves and Candied Apple DO for added effect.

11. Die cut the medium rose from the Tim Holtz Thinlits set. Adhere a piece clear jewelery thread to the edge. Roll the rose with a quilling tool and glue. Set aside to dry.

12. I coloured a piece of soft thick wire with alcohol inks for the stem.

13. The “stem” was attached to the rose bud with glossy accents and a small leaf added to the stem. I glued the jewelery thread into a small clear bead and with glossy accents adhered the bead to the top of the glass dome. Let this sit upside down to dry.

14. Cut 2 pieces of stone from the Mixed Media die.

15. Colour with DS to get a stone effect.

16. Adhere the die cut pieces to a piece of kraft paper with multi medium and sprinkle distress embossing powder (Pumice stone) over wet multi medium. Leave to dry completely. Once dry, shake off excess powder and heat set. Before adhering this to the base I coloured the edges with DC.

17. I used the largest banner from the banner thinlits set and aged it with DI, DO and DS.

18. Added my sentiment with rub-ons and stamps.

19. Add the words LIBRARY to the pediment with sticky rub ons and gold foil.

20. Stamp a flourish with DI and DO on the underside of the roof pieces.

21. Cut a piece of kraft paper slightly smaller than the book to make the base piece. A. I scraped gesso over and let it dry. B. Then added stenciling with DP and coated with Distress Crazing medium, set aside to dry. C. Once dry add DC to the panel blending with fingertip. Distress edges and adhere to book base.


22. A. I had printed 2 stained glass images onto acetate and coloured the images with Alcohol Inks. B. I then added Diamond Dust glitter to the back of the acetate with double sided tape to create a textured stained glass look. C. The back window of the luminary was stamped with a shattered glass stamp and heat embossed, I added some frosted vinyl behind the acetate and rubbed white DC over the image.


23. A. Adhere the panels of the luminary together with the tab on the long edge. Use a glue stick to add gold foiling randomly to all the pieces including the roof. B. Turn the panel pieces over to adhere the windows into the openings. I printed a scene from the movie showing the library on metallic vellum and adhered this with a curve to create depth in the luminary. C. Finish the assembly by adhering all the tabs of the pieces together to create the luminary base.


24. I like to add some more interest to the roof of this structure by using pearls between the roof and the main structure. A. Pierce holes with a hole piercer in the corners of the main structure. B. Also pierce holes in the corners of the roof piece and insert a decorative pin (these were white, I coloured them with alcohol ink) from the top through the roof structure, add some glossy accents to help keep this in place. C. Then add a larger bead/pearl to the bottom of the roof structure, again using some glossy accents to keep this in place. You would need to measure the space available for the pin to go into the structure and cut the excess of the pin off. Push the pins through the holes of the main structure, securing with glossy accents. D. Add the pediment to the front of the luminary.


25. A & B. I coloured white seam binding with a mixture of DS and DP. The ribbon was crinkled and left to dry, I made a bow, adding some gold string and tulle. C. This was adhered to the centre of the roof. 26. Then assembly started, I added the stone piece on the kraft base. I glued down the inside base of the luminary after finding the position of the main structure (some stenciling was added to this piece to flow from the image used in the window). The books were placed to the right of the structure position.


27. I adhered the floating rose and magic mirror on the left corner of the book base.

28. Cogsworth and Lumiere was placed to the left of the main structure leaving space for the banner title to be positioned in front of the structure.

29. Glue down the banner (I had also added gold foiling to the edges of the banner) and place the main structure over the base.
30. Finally I also inserted a small electric tea light of which I coloured the light section with yellow alcohol ink to soften the glow.

Thank you so much for the opportunity to showcase my creation on the Frilly and Funkie blog.
Supply list:
Dies:
Sizzix Tim Holtz Luminary Bigz Die
Sizzix Tim Holtz Pediments Die
Sizzix Tim Holtz Tattered Banners Die
Sizzix Tim Holtz Small Tattered Florals die
Sizzix Tim Holtz Mixed Media Die Set 3
Other:
Tim Holtz Lattice Stencil
Tim Holtz Glass Dome
Seam Binding
Gold String
Kraft Paper
Watercolour Paper
Gold Tulle
Blue Pearls
Pearl Pins
Tim Holtz Distress Embossing Powder – Pumice Stone
Tim Holtz Distress Ink – Various
Tim Holtz Distress Oxide – Various
Tim Holtz Distress Stain – Various
Tim Holtz Distress Paint – Various
Alcohol Ink – Various
Glossy Accents
Glue gun & glue sticks
Double sided tape
Acetate
Glue stick and foil
Diamond Dust Glitter
Multi Medium
Here are a few more views of the library from different angles:


* * *
Now that you have seen Denise's fun creation and have checked out all the inspiration provided by the Design Team, we hope you will share your project for the Read Any Good Books Lately challenge. You still have time as it runs until 11:55 pm EST on August 15th.
Denise, this is wonderful and oh so charming! I am a huge fan of the storybooks and truly adore your 3D adaptation! The stained glass is the icing on the cake and those little books are the best! It's such a pleasure to have you as our guest, thank you! Hugs, Autumn
ReplyDeleteAmazing Denise! I can't believe the level of detail you've gone to and all the elements you've tied into the story. Thank you so much for sharing your fantastic tutorial with us too xx
ReplyDeleteYou really wove the story into every detail of this gorgeous project. I have studied it and studied it, each time more amazed at the amount of time and attention, thought and craftsmanship that your poured into it. The little books fill me with delight...and the stained glass window is unbelievable. Thank you so much for being our guest designer!
ReplyDeleteThis is absolutely brilliant Denise, I love it. I can imagine the fun you had creating all the lovely little details. The film was fantastic wasn't ! Your creation is Wonderful, Wonderful, Wonderful xx
ReplyDeleteOops it should have said the film was fantastic wasn't it
DeleteDenise, I am speechless! I have been reading and scrolling up and down, like a kid in a candy shop! So many wonderfully and skillfully created details that I can't mention everyone of them! I want to say what my favorite part is, but I just can't...I love it all and am so appreciative of the love and effort that went into every square inch of this amazing 3D creation! And you've prepared a fantastic tutorial! Thank you SO MUCH for being our guest designer today and for stepping up to my 'books' challenge to boot! Well done! Hugs!
ReplyDeleteFabulous! This is so clever and gorgeous all in one! Thank you for joining us as a guest designer and inspiring us with your beautiful art!
ReplyDeleteThis is just magical. <3
ReplyDeleteThank you for sharing. :)
Where do you get the white seam binding from please?
So stunning...such a creative and clever idea. 😀
ReplyDelete