
I've had great fun playing with the new Dylusions paints, you'll definitely need a cuppa as there's lots to share !

The first project I'm sharing with you is a journal page and I've painted the pages with Gesso then used a babywipe with Fresh Lime Dylusions paint.

I then used my fingers and blended Cut Grass and Squeezed Orange over the pages. I stencilled the diamonds using London Blue and a Dylusions stencil.

I carried on stencilling this time with Dina Wakley stencils but using Cut Grass and Vibrant Turquoise.To do the stencilling I've used a Mini Blending Tool and really worked the paint into the foam pad.

I wanted this page to have impact and what better way than to use black ! I cut a piece of paper in to the wavy shape and used it to mask off the page so I could add Black Marble across the centre. As the paints are semi-opaque it needed three coats before the underneath colours were completely covered. I used a black Fude Ball pen to draw the scalloped edge.

There was plenty of paint left on the Mini Blending Tool so I used it to stamp the Dylusions flowers onto the page.

I pressed the Mini Blending Tool foam onto the pages to add circles of white then dabbed over the top with Lemon Zest. I also dabbed a circle onto a piece of paper then cut the circle out to create a mini stencil

I placed it over the top of the circles then used the Wendy Vecchi script stamp with Watering Can Archival ink and stamped over it.

I've written the words over the black centre panel using a white Sharpie pen. I then used the Mini Blending Tool that still had some White Linen on it and blended it around the edge of the page. To finish I've rubbed Black Marble around the edge to frame the page.


A couple of close up shots to finish with, the eagle eyed among you can see there are some bubbles in the black panel. I got distracted while I was drying the paint and it bubbled !

This next journal page started life by using the paint up from the blending tools that I used for the first page. I was lucky to attend one of Dyan's classes and one of the things she did all the time was to use up any left over paint on a different journal page. So, I did just that !

I carried on adding the dots of paint covering both pages.

I wanted to make this page more pastel than bright and by using the blending tool with White Linen and rubbing it it over the page it knocks the colours back.

I stencilled the border using the Dina Wakley Plastic Canvas Stars stencil using London Bus.

I've stamped the Wendy Vecchi flowers with Cut Grass and used the small circle stencil I made for the previous page and stamped the script onto circles of Lemon Zest.

The larger circles are made in the same way, I die cut a circle from paper and used it as a stencil, first using White Linen and then a little Fresh Lime around the edges.

I stamped the flower from the Dylusions set into each circle, then went in search of a quote !

I was inspired by a crafty friend who has been using quotes around circles on journal pages. The quote I found is anonymous but it said just what I wanted it to 'Focus on what matters...'

'and let go of what doesn't'. The shadow around the edges of these two circles is created using a Gelato. By pressing the blending tool with Black Marble on it over the small circles it just added the slight black outline as there wasn't much paint left.
I've just one last thing to share with you, if you're still awake !

I wanted to use the paints with a brayer, so painted a jumbo tag with Gesso then started with Lemon Zest and brayered some over the tag.

I dried the first colour then used Squeezed Orange.
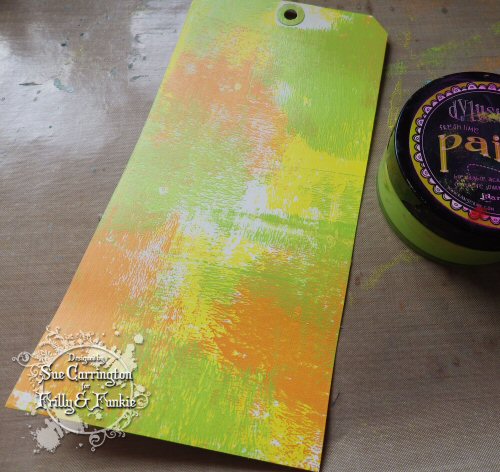
The last colour is Fresh Lime, I was careful not to completely cover the previous colours.

Dylusions sprays co-ordinate with the paints and also spray over them beautifully. So I took one of the Dina Wakley stencils and spritzed the tag with Squeezed Orange. Not wanting to waste the ink I flipped it over and pressed it onto a journal page that I'd already brayered with the excess paint.

I used a plastic card and dipped it into Black Marble and dragged it over the tag to create the lines. The dots are created by using the end of a paintbrush.

I added some more stencilling using Vibrant Turquoise using another Dina Wakley stencil.

To add some texture I mixed some Wendy Vecchi embossing paste with a little Vibrant Turquoise and spread it over Wendy's Alphabets stencil

To finish off I stamped the two sentiments, which are by Dina Wakley, with black Archival ink.

There was still a small amount of Black Marble on one of the Blending Tool so I pressed it onto the tag to create shadow circles.

I also rubbed Black Marble around the edges to frame the tag.
As you can see I've had lots of fun playing with the Dylusions paints. I hope you've enjoyed it too and remember that there is a special discount on the paints so what better time to stock up !
Sue
x
Oh Sue, these three projects are SO different and equally inspiring! LOVE how you use paints and these all look perfect with those strong, bold colours. And yet I do love that more muted one in the middle! Versatile too! Thank you so much for sharing. Jenny x
ReplyDeleteWow, I am just blown away Sue, these are incredible!! I just added about fifteen things to my wish list, holy cow! I love how you did the bubbles using the blender tool, so genius! Thanks for all the great tips, such a wonderful post! :)
ReplyDeleteWow, what a fantastic tutorial. You have shown the versatility of the paints with three completely different projects all of which I am drooling over. I love all the layers of paint you used to create your base and then with the stencils and stamping. The quotes are fabulous and so inspiring.
ReplyDeleteHugs!
Cec
Totally cool projects. I'm sure you had fun creating, because it was fun watching!!!
ReplyDeleteoh my this all looks delicious sue - stunning stencilling...beautiful colouring x
ReplyDeleteAmazing pages and tag Sue! I've always shied away from the Dylusions paints because they are such bright colours (not my comfort zone at all!) but you are changing my mind, wonderful makes!
ReplyDeleteI like all three, and learned some things, too. Thank you!
ReplyDeleteI like all three, and learned some things, too. Thank you!
ReplyDeleteI like all three, and learned some things, too. Thank you!
ReplyDeleteStunning pages with the most amazing details Sue. TFS and best wishes
ReplyDeleteAnnie x
Fabulous work with the Dylusions paints, Sue. I've just given in and ordered a couple of colours - then we'll see! Love the bold brights of the first, but it's the pastel bubbles of the second spread which have really captured my heart. Great to see the paints in action with a brayer as well, and with the inks - such a great post, thank you.
ReplyDeleteAlison xx
Your project has left me speechless, Sue!!! Your work and techniques are amazing! Like Deb said, I haven't worked with Dylusions due to the bright color palette, but you are convincing me to add them to my craft stash! I was so sorry to hear about the nightmare you had with your blog, but I'm glad you were able to get the new site going. I am going there to follow you now. I don't want to miss a moment of your gorgeous creations!!
ReplyDeleteHugs,
Nancy
Fabulous!!!!!!!!!!!!!!!!
ReplyDelete